I like a little Halloween decorating, but I’m not quite ready to turn my living room into a haunted attraction. A few ghosts, some soft lighting and something slightly spooky on the entryway table? Lovely. Fake cobwebs I’ll still be finding in December? Less appealing.
The Halloween crafts that catch my eye are the ones I can picture alongside the things I already own. Cheesecloth ghosts, amber potion bottles, paper bats and a simple garland can look festive without requiring a whole new collection of decorations—or a dedicated storage room afterward.
I’ve gathered 20 DIY Halloween craft ideas, from simple cutting-and-gluing projects to ones that involve painting or a little stitching. I haven’t personally made every project, so think of this as a collection of ideas to choose from rather than a list you need to tackle before October 31.
My suggestion is to pick one spot—a mantel, shelf, windowsill or entryway table—and start with two or three coordinating pieces. Check your cupboards and craft supplies first. Clean jars, leftover fabric, ribbon and empty bottles might already give you a head start.
And if you like the glowing ghost lanterns, use battery-operated LED tea lights. We’re aiming for a spooky atmosphere, not an unexpected visit from the fire department.
Looking for Craft Supplies?
Check what you already have first, then visit my Amazon storefront if you’d like to browse more finds. For these projects, choose supplies that suit your jar sizes, surfaces and display location—you don’t need to buy everything on the list.
As an Amazon Associate, I earn from qualifying purchases.
Images are AI-created project and styling inspiration; finished crafts may vary.

1. DIY Cheesecloth Ghost Lanterns
These little ghosts are an easy way to add some Halloween personality to a shelf or windowsill. A couple of jars, draped fabric and a soft glow—no advanced crafting skills or haunted-house budget required.
Supplies Needed
- Clean, dry glass jars in different heights
- Ivory or white cheesecloth, gauze or thin muslin
- Googly eyes or small black felt circles
- Adhesive dots or craft glue
- Scissors
- Battery-operated LED tea lights
Easy Steps
- Prepare your jars. Remove labels, wash the jars and let them dry completely.
- Cut the fabric. Drape it over each jar to measure, then trim it so it reaches the table with a little extra for flowing edges.
- Add your lights. Switch on an LED tea light and place it inside each jar.
- Shape your ghosts. Drape the fabric over the jar opening, letting it fall loosely down the sides. Secure it near the rim with small adhesive dots.
- Give them eyes. Attach googly eyes to the fabric, or use black felt circles for a simpler look.
- Style your display. Group two or three different heights on a shelf, tray or windowsill.
My Styling Tip
Thin fabric lets more light shine through. Start with one layer, then add another if you want a fuller ghost—too many layers can hide the glow. Googly eyes make them playful; small black felt eyes give them a more understated look.
Use battery-operated LED lights only. Keep real candles away from the fabric. We want glowing ghosts, not ghosts with a fire extinguisher.
2. Spiderweb Decorative Plates
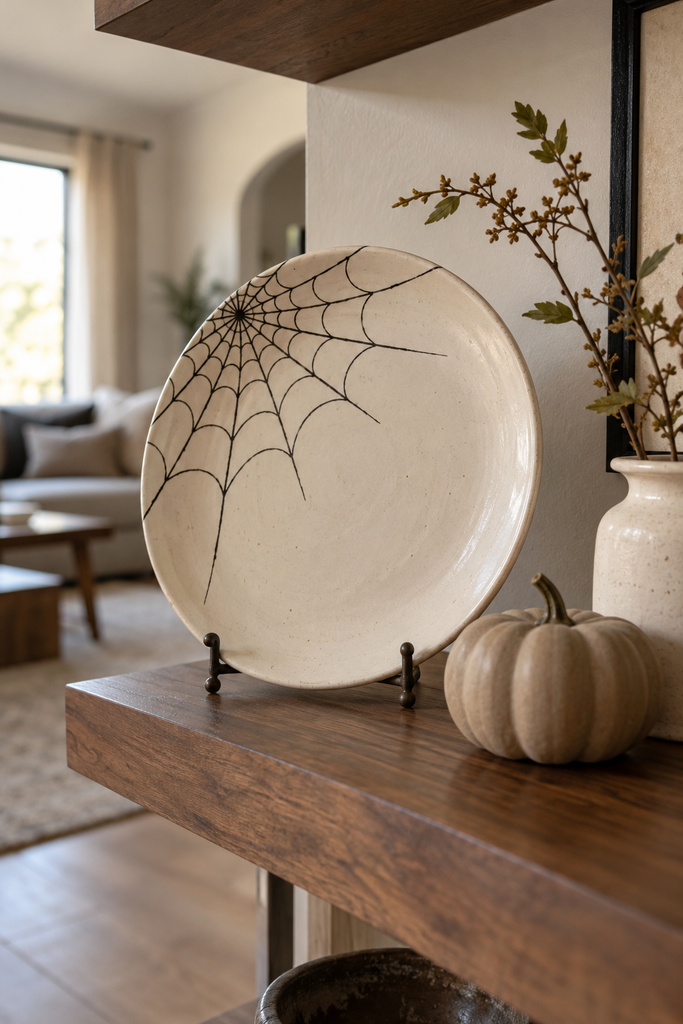
A simple spiderweb can turn an inexpensive plate into a Halloween accent without requiring an entire spooky dinnerware collection. I’d display this on a shelf or mantel rather than add another thing to wash after dinner.
Supplies Needed
- Plain ceramic or glass plate for decorative use
- Black paint marker suitable for the plate’s surface
- Scrap paper
- Paper towel and a suitable cleaning product
- Plate stand
Easy Steps
- Clean the plate. Remove grease and dust, then dry it completely.
- Practise your web. On scrap paper, draw several lines radiating from one point. Connect them with curved lines.
- Choose your placement. A web starting near one edge gives a more relaxed look than covering the entire plate.
- Draw the main lines. Use your paint marker to create the radiating strands.
- Connect the strands. Add curved lines between them, working outward from the centre.
- Let it dry. Follow the marker’s drying and curing instructions before handling.
- Display it upright. Place it on a plate stand beside a small pumpkin or LED candle.
My Styling Tip
A black web on an ivory plate is enough—you don’t need glitter, lettering and a giant spider competing for attention.
Treat this as a decorative plate. Ordinary craft markers aren’t automatically suitable for food contact. If you want to display treats nearby, put them in a separate food-safe dish.
3. Neutral Felt Pumpkin Garland
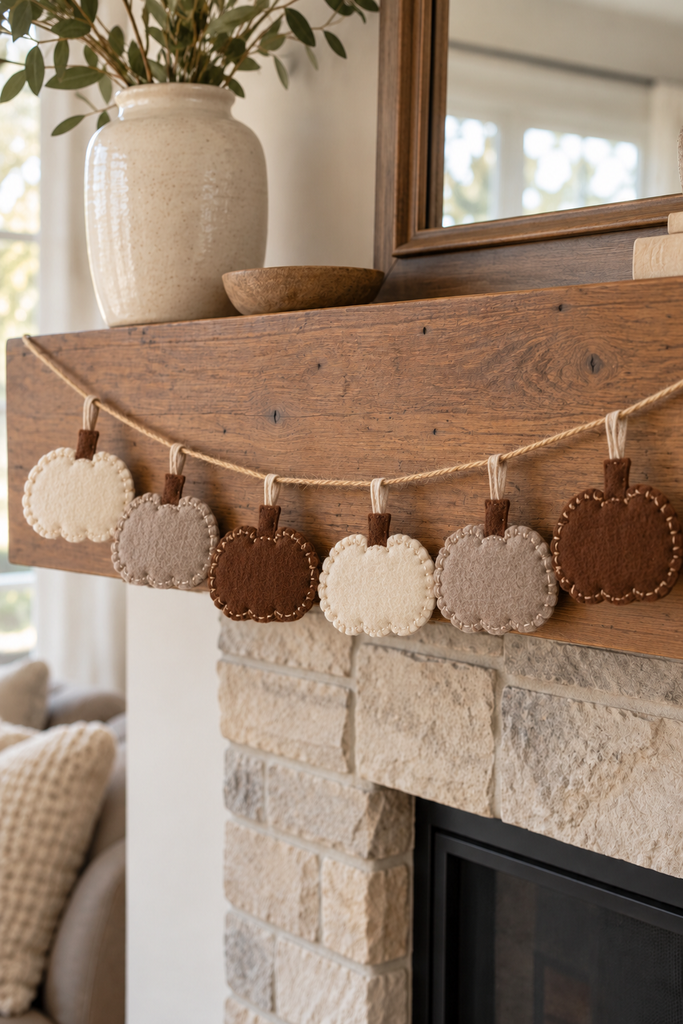
This is a softer take on a pumpkin garland, using cream, taupe and brown felt. It’s a good little project for an evening when you want to make something without turning the dining table into a permanent craft station.
Supplies Needed
- Felt in cream, taupe or brown
- Small piece of brown felt for stems
- Paper and pencil for a template
- Fabric scissors
- Needle and coordinating embroidery thread
- Small amount of fibre filling
- Twine
- Optional fabric glue suitable for felt
Easy Steps
- Make a template. Draw a simple pumpkin shape on paper and cut it out.
- Cut matching pairs. Trace and cut two felt shapes for each pumpkin.
- Add the stem. Cut a small brown felt rectangle and position it between the two layers at the top.
- Stitch the edges. Sew around the pumpkin, securing the stem and leaving a small opening.
- Add stuffing. Use just enough to give the pumpkin a little dimension.
- Close the opening. Stitch it neatly shut.
- Add a hanging loop. Sew a small thread loop securely near the stem.
- Assemble the garland. Thread the pumpkins onto twine, lay it flat and adjust the spacing before hanging.
My Styling Tip
Repeat two or three colours instead of making every pumpkin different. Light stuffing keeps them soft and allows the garland to hang comfortably.
For a simpler version, skip the stuffing and use flat felt pumpkins. If gluing the layers, follow the fabric adhesive’s instructions and let everything dry before hanging.

4. Textured Ghost Art
A small piece of textured ghost art can look surprisingly lovely tucked onto a shelf. Think simple shapes and soft colours—not a ghost with seventeen accessories and a motivational quote.
Supplies Needed
- Small rigid art panel suitable for your chosen texture medium
- Lightweight spackle suitable for the surface, or acrylic texture paste
- Palette knife
- Pencil
- Ivory acrylic paint
- Taupe or charcoal acrylic paint for the background
- Small paintbrush
- Black paint marker or fine brush for the eyes
- Table covering
Easy Steps
- Prepare the panel. Follow the panel and texture product’s preparation instructions.
- Paint the background. Apply your chosen background colour and let it dry.
- Sketch a ghost. Draw a rounded head and a loose, flowing bottom edge.
- Add texture. Spread a thin layer of spackle or texture paste inside the outline.
- Shape the surface. Use gentle downward strokes to suggest fabric folds.
- Let it dry fully. Follow the product’s instructions; thicker areas will take longer.
- Paint the ghost. Apply ivory paint over the dry texture.
- Add the eyes. Once the paint is dry, add two small black eyes.
- Display it. Let all materials dry or cure before leaning the panel on a shelf.
My Styling Tip
Keep the texture shallow. A thick mound is heavier, takes longer to dry and may crack.
One ghost with plenty of space around it often looks better than filling every inch. Check that your chosen texture product is compatible with the panel before starting.

5. Paper Haunted-House Window Silhouettes
Black paper silhouettes are an easy way to give a window a Halloween mood. They take up almost no storage space afterward, which is a strong selling point for anyone whose seasonal bins are already negotiating for more territory.
Supplies Needed
- Black cardstock
- Paper haunted-house template, or paper and pencil to draw one
- Scissors
- Craft knife and cutting mat for window openings
- Removable tape suitable for glass
- Optional ruler
Easy Steps
- Choose a simple design. Draw a house with a peaked roof, chimney and a few windows.
- Check the size. Hold the paper against your window before cutting the cardstock.
- Trace the template. Transfer the house outline onto black cardstock.
- Cut the outside shape. Use scissors for the roof and walls.
- Cut the windows. Place the cardstock on a cutting mat and carefully use a craft knife for the internal openings.
- Attach the silhouette. Use small pieces of suitable removable tape on the inside of the window.
- Check it after dark. Ordinary room lighting behind the silhouette helps the cut-out windows stand out.
My Styling Tip
A few larger shapes are easier to recognise from outside than lots of tiny details. Keep the cardstock away from condensation, and use a cutting mat rather than cutting directly on furniture.

6. Painted Halloween Treat Jars
These jars are the playful option in the collection. Classic candy-corn colours work well for a party, while cream and charcoal are an alternative if bright orange isn’t invited into your decorating plans.
Supplies Needed
- Clean glass jars with lids
- Paint suitable for glass
- Compatible primer, if required by the paint
- Paintbrushes
- Painter’s tape suitable for the surface
- Pencil and paper strip for marking bands
- Ribbon
- Wrapped sweets
- Table covering
Easy Steps
- Prepare the jars. Remove labels, wash and dry thoroughly.
- Check the paint instructions. Apply compatible primer if required.
- Mark your bands. Wrap a paper strip around the jar to help mark even divisions.
- Paint the outside. For candy-corn colours, use white at the top, orange in the middle and yellow at the bottom.
- Work in stages. Let each colour dry before masking or painting the next band.
- Remove tape carefully. Follow the paint and tape instructions to avoid lifting the finish.
- Let the paint cure. Keep paint off the rim, threads and inside of the jar.
- Finish the jar. Tie ribbon around the neck and fill it with individually wrapped sweets.
My Styling Tip
For a neutral version, paint the exterior ivory and add a narrow charcoal ribbon. The method stays the same.
Use wrapped sweets and keep food away from craft paint. Don’t describe the jars as dishwasher-safe unless the exact paint system allows it.

7. No-Carve Painted Pumpkins
Painted pumpkins let you change the colour without dealing with pumpkin guts. That alone makes this project considerably more appealing to me.
Supplies Needed
- Real or faux pumpkins
- Paint suitable for the pumpkin’s surface
- Compatible primer, if required
- Paintbrushes
- Mild soap, cloth and water
- Table covering
- Optional masking tape for simple patterns
- Optional compatible protective finish
Easy Steps
- Choose sound pumpkins. Avoid real pumpkins with soft spots or damaged skin.
- Clean and dry them. Wipe away dirt and let the surface dry completely.
- Prepare the surface. Follow your paint’s instructions, including primer if required.
- Apply a thin first coat. Paint around the pumpkin, keeping the stem clean if you want its natural colour.
- Let it dry. Follow the product’s instructions.
- Add another thin coat. Repeat only as needed for coverage.
- Add a simple pattern if desired. Stripes or a small ghost motif are easier to control than an elaborate design.
- Finish and display. Apply a compatible protective coating only if appropriate for your materials.
My Styling Tip
Chocolate brown, cream and taupe pumpkins look lovely grouped together. Mix sizes rather than buying several identical ones.
Faux pumpkins can be stored for another year. Real pumpkins will still deteriorate, and paint doesn’t make them weatherproof. Keep outdoor displays sheltered unless all materials are suitable for exposure.
For more seasonal projects with a similar understated look, browse my easy fall crafts to make and sell.

8. Felt Ghost Garland
A few felt ghosts can add personality without making the whole room look like a children’s Halloween party. Small eyes, simple shapes and a little restraint do most of the work.
Supplies Needed
- Ivory or white felt
- Black felt
- Paper and pencil
- Fabric scissors
- Needle and coordinating thread
- Twine
- Fabric glue suitable for felt, if preferred for the eyes
Easy Steps
- Make your template. Fold paper in half, draw half a ghost along the fold, then cut and unfold.
- Cut the felt. Use the template to make several matching ghosts.
- Add the eyes. Cut small black felt circles or ovals and stitch or glue them in place.
- Let adhesive dry. Follow the glue instructions before assembling.
- Arrange the ghosts. Lay them along the twine and check the spacing.
- Attach at two points. Stitch each ghost to the twine near both upper edges so it hangs upright.
- Hang the garland. Use suitable hooks and allow a gentle curve.
My Styling Tip
Flat ghosts are the easiest version and store neatly. Keep the eyes small for an understated look, or use googly eyes if you prefer something more playful.
Attach the ghosts securely rather than relying on one loose stitch that lets them spin sideways.

9. DIY Paper Bat Decorations
Paper bats are one of those simple Halloween ideas that can look much better than the effort involved. A little cluster around a mirror or window is plenty—your walls don’t need to become an airport for bats.
Supplies Needed
- Black cardstock
- Paper and pencil for a template
- Scissors
- Removable tape or adhesive suitable for your display surface
- Optional ruler
Easy Steps
- Create a template. Fold paper in half and draw half a bat along the folded edge.
- Cut and unfold. Adjust the wings until you like the shape.
- Make different sizes. Create two or three templates for variety.
- Cut the cardstock bats. Fold the cardstock and use the same method.
- Shape the wings. Leave window bats flat; gently fold wall bats’ wings forward for dimension.
- Plan the arrangement. Lay them out or position them temporarily before attaching.
- Secure them. Use a small amount of surface-compatible removable adhesive.
My Styling Tip
Arrange the bats in a loose upward sweep, with smaller ones toward the top. That looks more intentional than spacing them evenly like a wallpaper pattern.
Test adhesive discreetly first. “Removable” doesn’t guarantee it won’t affect every painted wall or finish.
10. DIY Mummy Lanterns
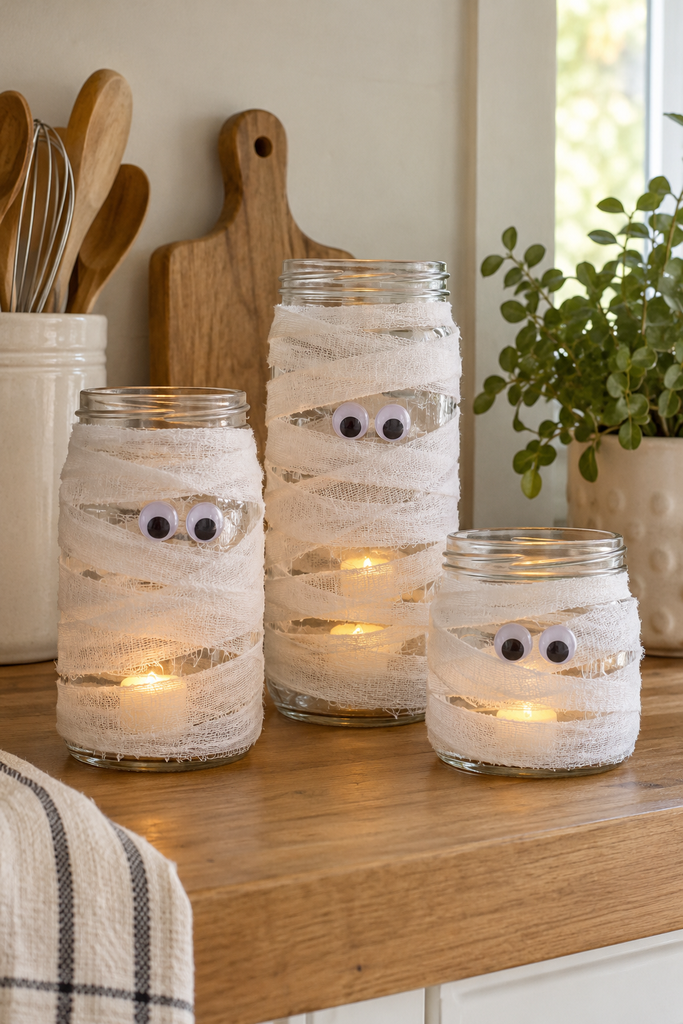
These are the wrapped cousins of the draped ghost lanterns. They’re a little sillier, but a small group on a party table can be charming—and empty jars finally get another job.
Supplies Needed
- Clean, dry glass jars
- Gauze or narrow cheesecloth strips
- Googly eyes
- Adhesive dots or craft glue
- Scissors
- Battery-operated LED tea lights
Easy Steps
- Prepare the jars. Remove labels, wash and dry.
- Attach the first strip. Secure one end of the gauze near the bottom with an adhesive dot.
- Wrap loosely. Work upward, overlapping some areas and leaving small gaps for light.
- Secure the end. Attach it discreetly at the back.
- Add the eyes. Glue them onto the gauze near the upper half.
- Insert the lights. Place an LED tea light inside each jar.
- Adjust the wrapping. Loosen or reduce layers if the light is barely visible.
My Styling Tip
Use glass jars rather than opaque cans so light can shine through the sides. Slightly uneven wrapping gives them personality.
Keep the jar opening clear so you can reach the LED light. Use battery lights only—gauze and real flames don’t belong together.

11. Mini Witch’s Broomsticks
These little broomsticks bring in natural texture without needing much decoration. They’re also an excuse to collect sticks on a walk and call it productive.
Supplies Needed
- Clean, dry thin twigs
- Wooden dowels or straight sticks for handles
- Twine
- Scissors
- Pruning snips suitable for the twigs
- Optional craft glue suitable for wood
- Table covering
Easy Steps
- Choose your scale. For a tabletop version, start with a handle roughly 20–25 cm long and twig bristles around 8–10 cm long.
- Prepare the twigs. Remove loose dirt and trim them to similar lengths.
- Build the bundle. Arrange the twigs around one end of the handle, overlapping the handle enough to hold securely.
- Bind tightly. Wrap twine several times around the overlapping area.
- Tie a firm knot. Add compatible glue at the join if additional support is needed.
- Trim the bristles. Even up the ends, leaving a slightly natural shape.
- Display them. Lean a few against a small container or arrange them on a tray.
My Styling Tip
Make one broom first and adjust the proportions before making a batch. The measurements are a starting point, not a requirement.
Dry materials are easier to store. Keep the twig decorations away from flames, and treat pruning snips and hot glue—if used—as adult tools.

12. DIY Painted Skull Planters
A skull planter is the slightly moodier option in the group. Painting it ivory or charcoal can make it feel more like a seasonal accent than something borrowed from a haunted-house gift shop.
Supplies Needed
- Plain skull-shaped planter or decorative container
- Paint suitable for its material
- Compatible primer, if required
- Paintbrush
- Table covering
- Small plant in a nursery pot, or a faux plant
- Waterproof liner or saucer if appropriate
Easy Steps
- Check the container. Note its material and whether it has drainage.
- Clean and dry it. Remove dust and grease.
- Prepare for painting. Use compatible primer if required.
- Paint the exterior. Apply thin coats, allowing drying between coats.
- Let it cure. Follow the paint instructions before adding a plant.
- Insert the nursery pot. Use the skull as a decorative outer container if it has no drainage.
- Protect the furniture. Check for leaks and add a suitable saucer or liner where needed.
My Styling Tip
A small faux plant is the simplest seasonal option. For a real plant, remove the nursery pot to water it and let it drain before returning it.
Don’t add loose soil directly to a container without drainage and assume the plant will be happy about it.

13. Spiderweb Table Runner
A simple spiderweb runner can make ordinary dishes feel Halloween-ready. It also gives you a reason to stop decorating before the table has no room left for dinner.
Supplies Needed
- Black fabric
- Measuring tape and ruler
- Fabric scissors
- Fabric chalk
- White or silver fabric paint or marker
- Cardboard or a protective sheet
- Sewing supplies or suitable fabric adhesive for finishing edges
- Iron, only if required by your chosen products
Easy Steps
- Measure the table. Choose the width and length, allowing space for place settings.
- Include finishing allowance. Add enough fabric for your chosen hem method.
- Cut the runner. Keep the edges straight.
- Finish the edges. Sew a narrow hem or use a suitable fabric adhesive according to its instructions.
- Protect the work surface. Place cardboard beneath the fabric.
- Sketch the web. Draw the radiating lines and connecting curves lightly with chalk.
- Trace with fabric paint. Work slowly to avoid thick blobs.
- Dry and set the design. Follow the paint instructions, including heat-setting if required.
- Remove chalk marks. Use the method appropriate for your fabric and paint.
My Styling Tip
Place the web toward one end or corner for a quieter look. Chalk is a temporary guide, not a substitute for a permanent fabric finish.
Follow the paint’s washing instructions and keep fabric clear of candles and other heat sources.
14. Ghost Window Shapes
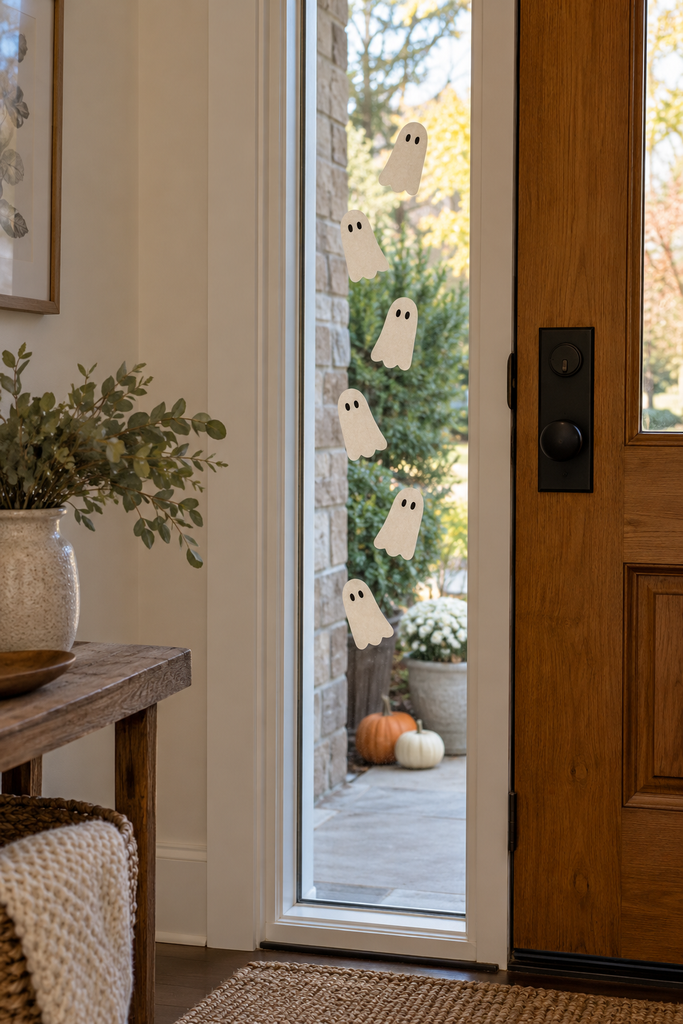
A ghost trail can make trick-or-treat night feel a little more fun. I’d keep it temporary, though—Halloween ghost cut-outs are less charming when they become a permanent feature of the front steps.
Supplies Needed
- Simple ghost template
- Pencil and scissors
- Removable decal material specifically suitable for the intended surface
- Clean cloth
- Optional measuring tape
Easy Steps
- Choose the location carefully. Use a dry, sheltered surface. A window or wall beside the entrance is simpler than a walking surface.
- Check the material. Confirm that it is intended for that surface and exposure.
- Test a small piece. Follow the manufacturer’s application and removal instructions.
- Trace the shapes. Make a small series of footprints.
- Cut them out. Keep the shapes simple and recognisable.
- Clean and dry the surface. Apply the footprints in a staggered trail.
- Remove them afterward. Follow the material’s instructions rather than scraping.
My Styling Tip
Don’t use ordinary craft paint on paving and assume it will wash away. For a floor or path, use only material specifically intended for foot traffic with suitable slip resistance.
If you can’t find an appropriate product, move the trail onto a window or wall. The idea still works without putting anything underfoot.

15. Floating Paper Witch Hats
A few floating hats above an entryway display can look delightfully witchy. No bright balloons required, and no one has to wonder whether a balloon popping was part of the spooky entertainment.
Supplies Needed
- Lightweight black cardstock
- Paper cone-and-brim template
- Scissors
- Craft glue
- Narrow ribbon
- Lightweight hanging thread
- Needle or small hole punch
- Removable ceiling hooks suitable for the surface and load
Easy Steps
- Make a paper trial. Check the cone and brim fit before cutting the cardstock.
- Cut the pieces. You’ll need a cone shape and a circular brim with a centre opening.
- Form the cone. Roll it and glue the overlapping seam.
- Attach the brim. Use folded tabs at the cone’s base, glued underneath the brim.
- Add ribbon. Wrap it around the base to cover the join.
- Attach the hanging thread. Secure it near the tip without tearing the paper.
- Test one hat. Check that the thread and hook hold securely.
- Hang at different heights. Position them above a display area.
My Styling Tip
Keep the hats lightweight and use a small group. Check the hook’s load rating and surface compatibility.
Hang them clear of fans, light fittings, heat sources and walking routes. A display corner is better than dangling hats at forehead height.
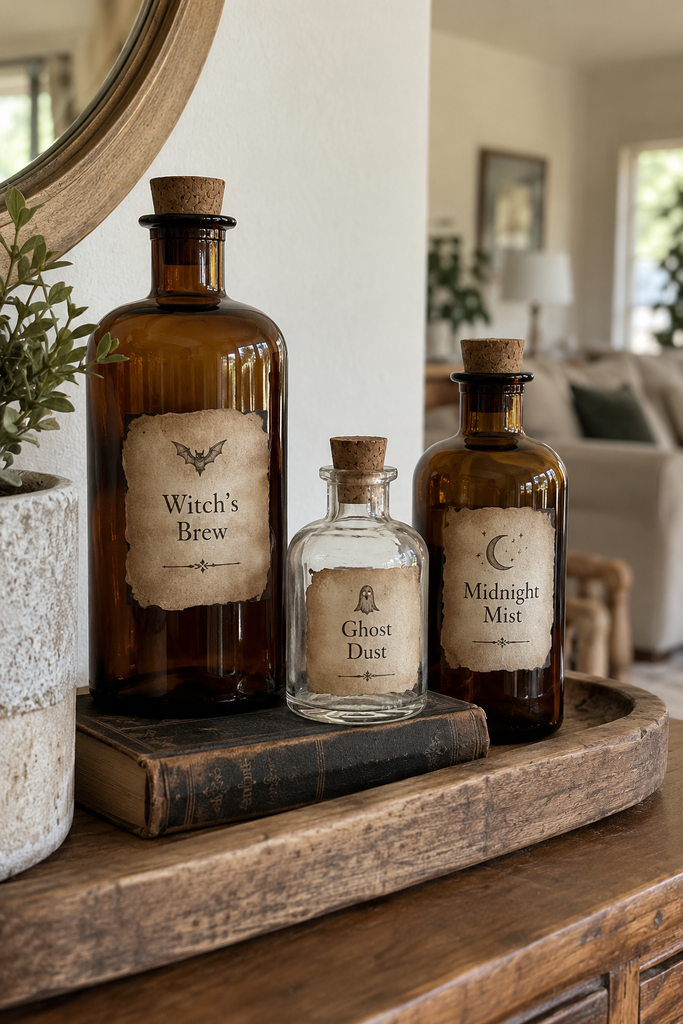
16. DIY Potion Bottles
Empty bottles, a few labels and suddenly you have a tiny potion collection. Finally, a decorating project that makes keeping an interesting bottle seem completely reasonable.
Supplies Needed
- Clean glass bottles in different sizes
- Corks or caps that fit
- Paper or adhesive label sheets
- Pen or printer
- Scissors
- Adhesive suitable for paper and glass
- Optional brown ink pad for aged edges
- Optional tray or old books for styling
Easy Steps
- Clean the bottles. Remove existing labels and wash thoroughly.
- Dry completely. Leave the bottles empty for an easy, leak-free display.
- Create your labels. Try names such as “Witch’s Brew,” “Ghost Dust” or “Midnight Mist.”
- Trim them to fit. Leave enough glass showing around each label.
- Age the edges if desired. Lightly dab with brown ink and let it dry.
- Attach the labels. Smooth them onto the bottles using suitable adhesive.
- Add corks or caps. Group the bottles in different heights.
My Styling Tip
Amber bottles already provide colour, so you don’t need glitter or liquid inside. Two or three readable labels look more convincing than covering every bottle in tiny lettering.
If you add any contents, mark the bottles “Decorative Only—Do Not Drink,” secure the closures and keep them away from children and pets. Avoid old containers that held hazardous substances.
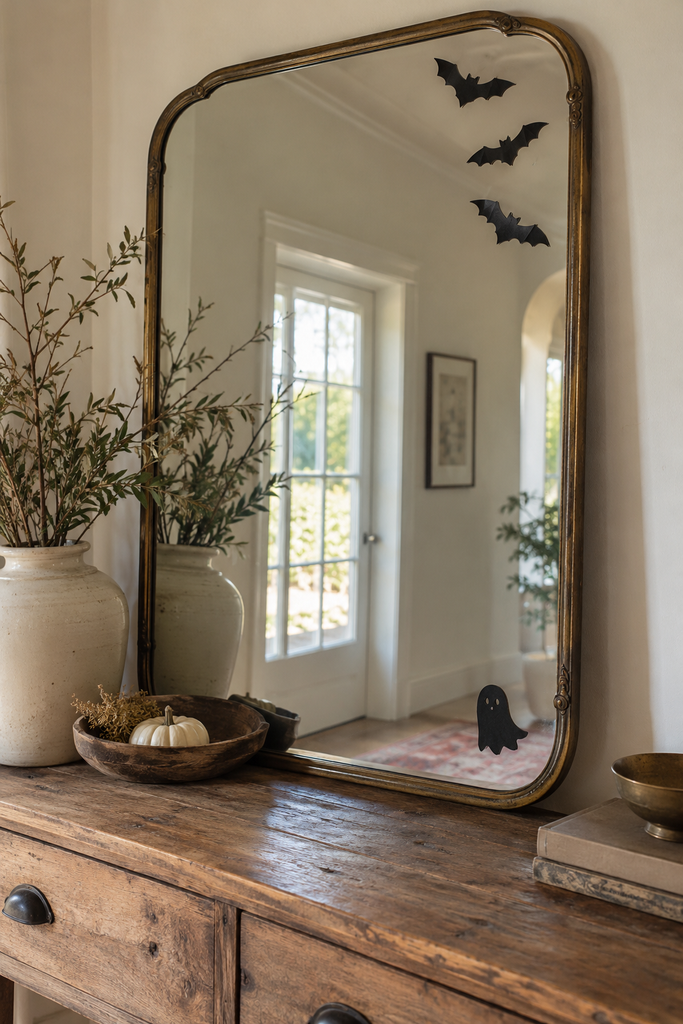
17. Temporary Haunted Mirror
An everyday mirror can have a brief Halloween identity crisis without needing a permanent makeover. A few removable bats or a small message are enough.
Supplies Needed
- Clean mirror
- Black paper silhouettes and removable adhesive suitable for glass
- Or a marker specifically labelled for removable use on glass
- Scissors
- Soft cloth
- Manufacturer-recommended cleaning supplies
Easy Steps
- Choose a temporary method. Use paper silhouettes or an appropriate removable glass marker.
- Test first. Check an inconspicuous area and confirm how the material removes.
- Clean the glass. Let it dry fully.
- Plan the placement. Keep the design around an edge so the mirror remains useful.
- Add the decoration. Attach a few paper bats or write a short message such as “Something Wicked.”
- Check the reflection. Avoid covering the whole mirror.
- Remove after Halloween. Follow the product’s instructions.
My Styling Tip
Keep temporary products on the glass unless they’re also approved for the frame’s finish.
If you want a permanent project, use a thrifted frame and paint suitable for its material. That’s a separate option—not a reason to put permanent paint on a mirror you still like.

18. Black Lace Halloween Lanterns
Black lace gives a simple glass holder a softer, slightly gothic look. It’s a small change with a lovely effect—especially when the rest of the display stays simple.
Supplies Needed
- Glass jars or candle holders
- Black lace
- Measuring tape
- Scissors
- Adhesive suitable for glass and fabric
- Optional narrow ribbon
- Battery-operated LED candles
Easy Steps
- Clean the holders. Wash and dry them.
- Measure around each one. Allow a small overlap for the lace seam.
- Choose the lace height. Keep it below the rim.
- Cut the lace. Check the fit before applying adhesive.
- Secure it at the back. Use a small amount of suitable adhesive and smooth the lace around the glass.
- Add ribbon if desired. Keep it simple and secure it away from the opening.
- Let the adhesive dry. Follow its instructions.
- Insert LED candles. Check the effect in both daylight and low light.
My Styling Tip
Open-pattern lace lets more light through than dense fabric. Try one holder before making several.
Use battery-operated candles only. Lace, ribbon and adhesive shouldn’t be placed around a real flame.
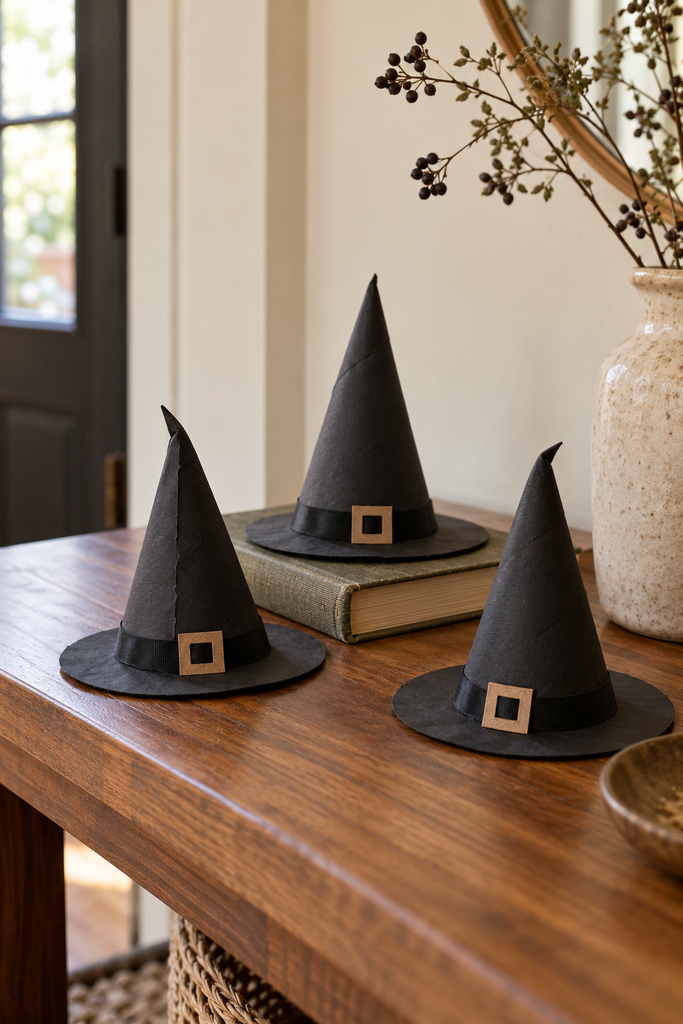
19. Mini DIY Witch Hats
These little hats are a tabletop version of the floating ones. They’re useful for a shelf, party display or place setting—and considerably easier to store than a life-size witch.
Supplies Needed
- Black cardstock
- Paper for a trial template
- Pencil and ruler
- Scissors
- Craft glue
- Narrow ribbon
- Optional small paper buckle
Easy Steps
- Make a trial cone. Cut a paper sector—a wedge from a circle—and roll it into a cone.
- Adjust the size. Aim for a small tabletop hat, roughly 10–15 cm tall, or choose a size that suits your display.
- Make the brim. Cut a circle wider than the cone’s base.
- Cut the opening. Make the centre opening slightly smaller than the cone’s base.
- Transfer the trial to cardstock. Include a seam allowance and small tabs along the cone’s bottom edge.
- Glue the cone seam. Let it hold firmly.
- Attach the brim. Push the bottom tabs through the opening, fold them outward and glue underneath.
- Cover the join. Wrap ribbon around the base and add a paper buckle if desired.
My Styling Tip
Making one paper trial saves wasting cardstock on cones and brims that don’t fit. Use its pieces as templates for the rest.
These hats are decorative. Keep them clear of candles, and allow the glue to dry fully before moving them.
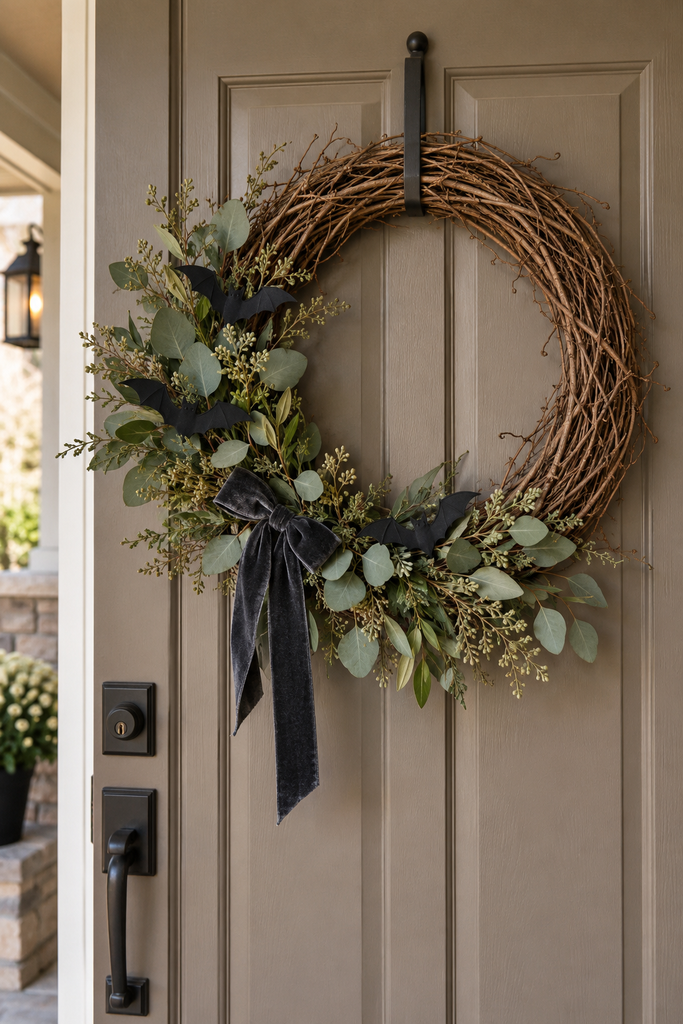
20. Simple Halloween Wreath
A grapevine wreath with muted foliage and a few black bats can make the front door feel seasonal without requiring a shopping cart full of decorations. Sometimes knowing when to stop is the most useful crafting skill.
Supplies Needed
- Grapevine wreath base
- Faux foliage suitable for the display location
- Floral wire
- Wire cutters
- Charcoal or black ribbon
- Small bat decorations suitable for the location
- Wreath hanger or suitable hook
- Optional craft glue compatible with the materials
Easy Steps
- Choose the location. Decide whether the wreath will hang indoors or on a sheltered door.
- Lay out the materials. Arrange everything before attaching it.
- Add the foliage. Group stems along one side, following the wreath’s curve.
- Secure with wire. Wrap stems firmly to the base and tuck cut wire ends inward.
- Add the bats. Attach a small group using wire or suitable adhesive.
- Finish with ribbon. Use a simple bow or hanging tails.
- Check the hanging point. Make sure the wreath and decorations are secure.
- Hang and adjust. Step back and remove anything that makes the arrangement feel crowded.
My Styling Tip
Let some of the grapevine show. Charcoal ribbon, muted foliage and a few bats create a clear Halloween look without needing every seasonal colour.
Paper bats and ordinary indoor ribbon won’t necessarily withstand rain. Use appropriate materials for exposed locations, or keep the wreath indoors or sheltered.
Final Thoughts
You certainly don’t need to make all 20 projects. Pick the ones you’d actually enjoy making—and have somewhere to display. I’d rather have a few lovely Halloween touches than spend November wondering where to store an entire collection of miniature witches.
If you’re unsure where to start, choose one spot and two or three coordinating crafts. Ghost lanterns, potion bottles and a felt garland work nicely together on an entryway table. Paper bats and a simple wreath can give the front entrance a little Halloween personality without much fuss.
Before ordering supplies, check your cupboards and leftover craft materials. Clean jars, ribbon, fabric scraps and empty bottles might already cover part of your list. Make one sample before buying enough supplies for a whole batch, especially if you’re trying a new technique.
Which project would you try first—or have you made a Halloween decoration you bring out every year? I’d love to hear about it in the comments.
You Might Also Like
If you’re enjoying a little seasonal crafting and decorating, these ideas might be next on your list:
- Easy Fall Crafts to Make and Sell — More handmade décor ideas to make for your home, give as gifts or consider for a small craft-market collection.
- How to Decorate Your Home on a Budget Without Making It Look Cheap — Simple ways to mix DIY projects, affordable finds and pieces you already own.
- 4 DIY Christmas Ornaments That Look Expensive — For when you’re ready to trade the little ghosts for velvet, warm neutrals and Christmas crafting.
Leave a Reply