If you’re anything like me, your dream is a Christmas tree that looks like it belongs in a luxury catalog — moody neutrals, velvet textures, and just the right amount of sparkle. But your reality? A budget, a kitchen table, and possibly a toddler or two underfoot. Don’t worry, I got you. These four DIY ornaments are beginner-friendly, inexpensive, and still have that “designer” vibe. Bonus: they’re fun to make, even if your crafting skills rival a three-year-old’s (trust me, I know).
Whether you’re looking for a hands-on holiday activity with kids, a quick DIY for your tree, or a way to elevate your neutral décor, these ornaments have got you covered.
Materials You’ll Need
Here’s everything you’ll need to make all four ornaments. I’ve linked products that are budget-friendly and beginner-friendly.
| Material | Description | Where to Buy / Affiliate Link |
|---|---|---|
| Clear plastic ornaments | Walmart: 8 for $11.98, Michaels: 8 for $13.99 | [Amazon] |
| Flocking powder | Velvet effect; multiple colors | [Amazon link] |
| Acrylic craft paint | Matching colors for velvet & textured ornaments | [Amazon link] |
| Foam & paint brushes | For smooth paint application | [Amazon link] |
| Mod Podge | To hold flocking powder | [Amazon link] |
| Rub & Buff (antique gold) | Adds metallic/vintage look | [Amazon link] |
| Velvet ribbon | Elegant finishing touch | [Amazon link] |
| Faux dried florals | For floral ornament fill | [Amazon link] |
| Baking soda & flour | For textured ornaments | [Amazon link] |
Pro Tip: If you have kids or pets, plastic ornaments are a safer choice. I broke two glass ones just by handling them.

1. Velvet Ornaments
Step-by-Step:
- Remove the caps from your clear ornaments.
- Set up a drying station: take a sturdy box and poke several small holes in the top. These holes will hold sticks upright so your ornaments can dry without touching any surfaces — no smudges, no sticking, no stress. You can also tape the ornament to the stick to keep it steady while you work, which makes paint and flocking application much simpler.
- Pour your craft paint onto a paper plate for easy access and minimal mess.
- Paint the first layer of the ornament with a regular brush. Don’t stress about brush lines — the flocking powder will cover them.
- Add a second layer with a foam brush for a smoother finish.
- Coat the ornament with liquid glue, then sprinkle flocking powder over it. Press firmly to ensure even coverage.
- Paint the ornament caps with black paint and antique gold Rub & Buff using a dabbing motion.
- Add velvet ribbon when hanging.
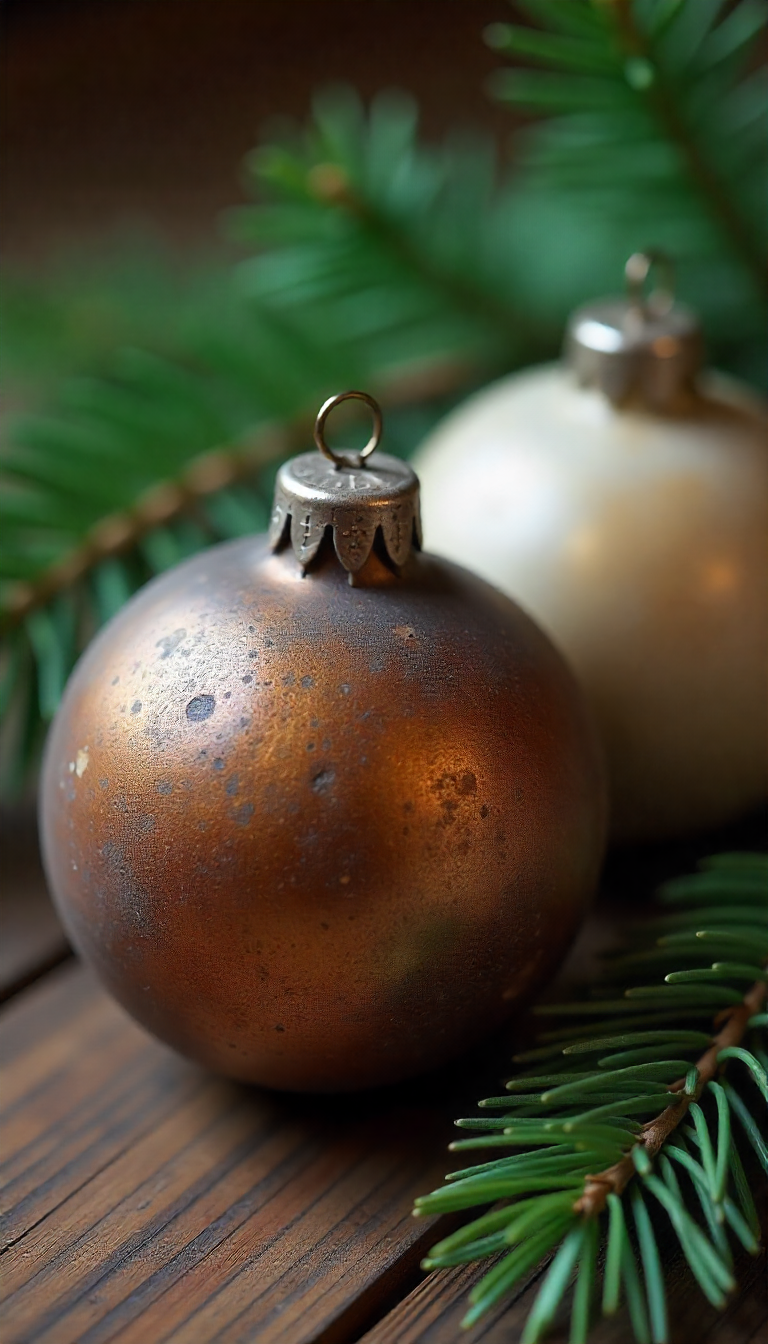
Pro Tip: Paint the caps and add a touch of Rub & Buff (antique gold or matching metallic). This creates a cohesive, high-end look. Leaving the stock silver caps can feel jarring and disrupt the designer vibe.
Picture This:
Your tree is dressed in deep velvet browns, soft tans, and muted greens, each ornament catching the warm glow of twinkling lights. The platinum velvet ribbon drapes elegantly, giving a magazine-worthy look without the hefty price tag.
3. Neutral & Brown Painted Ornaments
Step-by-Step:
- Choose Your Paint Colors:
- I used Linen (light beige) and Coffee Bean (rich brown). These colors create a warm, neutral palette that pairs beautifully with other ornaments and metallic accents.
- You can also experiment with taupes, soft greys, or muted blush tones for variety.
- Prepare the Ornament:
- Remove the cap and clean the ornament with a soft cloth to remove dust or fingerprints.
- Set up your workspace with a paper plate or small tray for paint. This keeps your surface clean and lets you access paint easily.
- First Coat of Paint:
- Using a foam brush, apply the first layer of paint evenly around the ornament.
- Don’t worry if the coverage isn’t perfect — the second coat will smooth things out.
- Let this coat dry for about 30–60 minutes (depending on paint type).
- Second Coat & Smooth Finish:
- Apply a second coat of paint with the foam brush for full coverage.
- Check for streaks or uneven areas and touch up lightly.
- Let dry completely before moving on.
- Add Antique Gold Highlights:
- Using Rub & Buff in Antique Gold and a small sponge or soft cloth, lightly dab the ornament surface.
- Focus on raised areas or edges for a subtle, designer-style shimmer.
- Rotate the ornament while dabbing to create a natural, uneven metallic look — perfection isn’t necessary.
- Replace Cap & Add Ribbon:
- Once dry, reattach the ornament cap.
- Add a neutral or metallic ribbon for hanging — I used a platinum velvet ribbon to tie the look together.
Picture This:
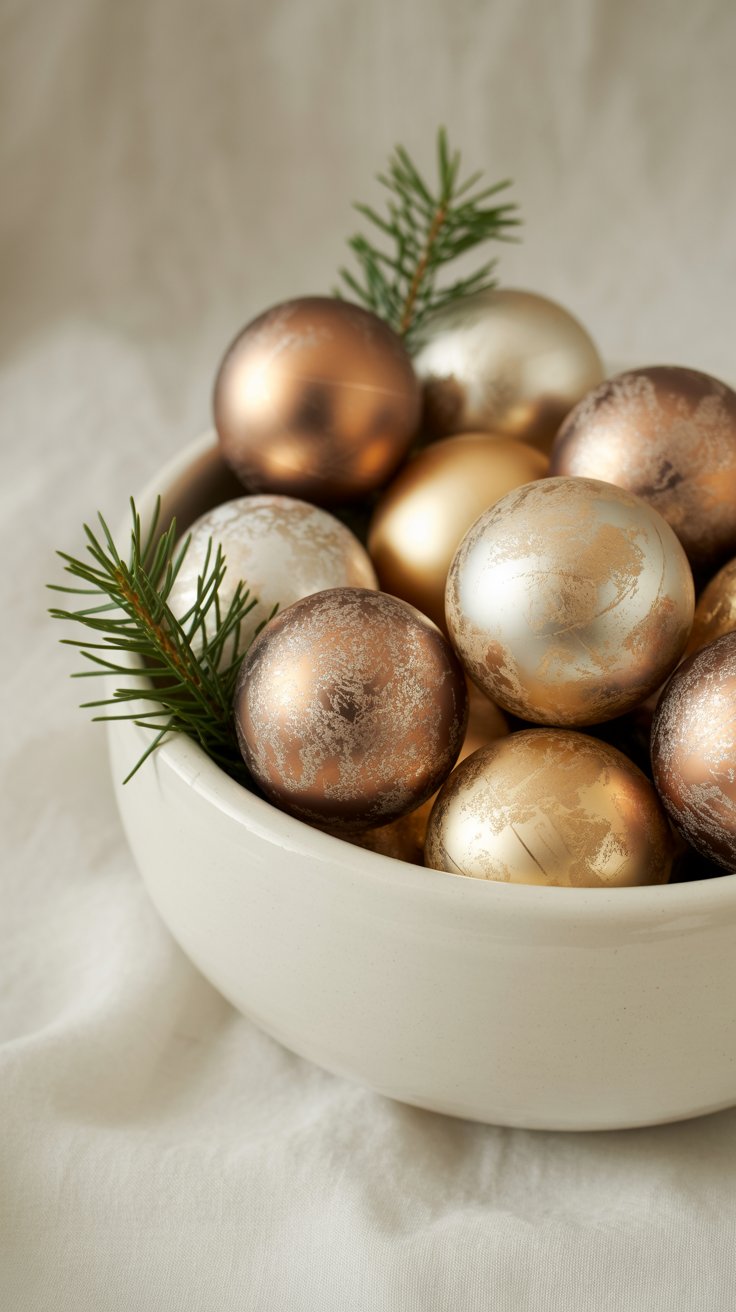
Picture a set of ornaments in soft beige and rich brown, with just a hint of antique gold shimmer catching the twinkle of your tree lights. Mixed with velvet, floral, or textured ornaments, these neutrals add warmth, depth, and a polished, high-end feel to your holiday décor.
Pro Tips:
- Use a foam brush for smooth, even paint coverage.
- Don’t overdo the gold — subtlety keeps it looking classy.
- Rotate the ornament while applying metallic highlights to make it look natural.
- If your hands get messy, use disposable gloves or a paper towel to hold the ornament.
4. Textured Ornaments with Baking Soda & Flour
Step-by-Step:
- Choose Your Base Colors:
- I started with Cool Concrete (a soft, neutral terracotta) for one ornament and a darker base for another.
- You can mix shades or stick with neutral tones — the texture will create visual depth.
- Prepare the Ornament:
- Remove the cap and clean the surface with a soft cloth.
- Set up your workspace with a paper plate or small tray for paint.
- Optional: use a box with small holes and sticks (like in Project #1) so your ornament can dry without touching surfaces.
- First Paint Layer:
- Apply a smooth coat of base paint using a foam brush.
- Let dry completely before adding texture.
- Create Texture with Baking Soda:
- Mix a small amount of baking soda into your paint to create a gritty, textured finish.
- Apply this mixture with a regular paintbrush (foam brushes don’t work well with the thicker texture).
- Cover the entire ornament, then let it dry for at least an hour.
- Add a Lighter Layer:
- Once dry, dab a lighter color (like Adore White) over the ornament using a sponge.
- Focus on raised areas to highlight the texture and give depth.
- Metallic Accents:
- Mix gold and copper paint (more gold for subtle shimmer) and lightly dab over textured areas with a sponge.
- This adds a subtle designer finish without overpowering the ornament.
- Dusty Flour Finish:
- Sprinkle flour lightly over the ornament to give a soft, dusty effect.
- Let it sit for 1–2 hours, then gently brush off the excess with a soft brush.
- Optional Rub & Buff Touch:
- For extra shimmer, place a tiny amount of antique gold Rub & Buff in a plastic bag and rub the ornament gently.
- This gives an uneven metallic effect that feels high-end.
- Cap & Hang:
- Replace the ornament cap and hang with your favorite ribbon. Neutral or metallic ribbons work beautifully with this style.
Picture This:
Imagine ornaments with subtle layers of texture, a dusty finish, and soft metallic highlights catching your tree lights. The interplay of beige, brown, and golden tones creates depth and sophistication, giving your DIY ornaments a custom, high-end look that feels utterly luxe.
Pro Tips:
- Use a regular brush for baking soda mixtures — foam brushes get messy.
- Add plenty of flour — it will brush off easily, so don’t be shy. It’s much harder to add more after the paint and texture layers have dried.
- Rotate the ornament while applying metallics to get natural variation.
- Let each layer dry completely before moving to the next — patience is key for this textured look.
Final Thoughts
And there you have it — four easy DIY Christmas ornament ideas that look way more high-end than their price tags suggest. Whether you’re drawn to the soft velvet texture, the delicate dried florals, or that perfectly imperfect textured finish, each one adds a touch of magic to your holiday décor.
What I love about these is how customizable they are — you can play with colors, finishes, and ribbons to suit your style (or your current neutral obsession, which I fully support). Once you paint those ornament caps with a hint of Rub & Buff, they instantly go from basic to boutique.
If you try any of these, tag me or drop a comment — I’d love to see your creations! And if you’re looking for more festive DIYs that blend timeless style with cozy charm, you’ll love my post:
👉 10 Cozy Christmas Decor Ideas That Feel Expensive (But Aren’t)
Pin This for Later 🎄
Save this guide for when the holiday crafting mood strikes (because we both know it will). These DIY ornaments are the kind of projects that make your tree — and your home — feel personal, stylish, and completely one-of-a-kind.
As an Amazon Affiliate, I earn from qualifying purchases at no extra cost to you.
Leave a Reply